Windows 10 Can't Connect to This Network [Step-by-Step Guide]
Most common cause for this connection error is an outdated driver
![]() 15 min. read
15 min. read
![]() Updated on
Updated on
Share this article
This article is translated in


Improve this guide
Read our disclosure page to find out how can you help Windows Report sustain the editorial team Read more
Key notes
- Windows 10 sometimes won't connect to the Internet, and there can be a multitude of reasons for that.
- Depending on the exact error, there are various solutions that you can try out, with varying levels of difficulty.
- Network problems are common and this message is a generic one from Windows.
- There are two general types of network problems, some of them being categorized as physical and others as setup-related.
Internet access is crucial for many people today, and there have been reports that users are getting Windows 10 can’t connect to this network message while trying to establish an Internet connection.
This, in turn, can cause a wide range of problems, including not being able to work remotely, stopping you from researching a problem, and even not allowing you to enjoy a relaxing time with your family watching your favorite shows.
No matter which category you fit in, solving network issues as fast and securely as possible is paramount.
In this guide, we will cover every way of dealing with network issues, including the most common solutions for general problems and also step-by-step information for troubleshooting specific issues.
Why is my laptop showing Can’t connect to this network?
This issue can occur if your PC isn’t connected to the Internet there are multiple causes for this issue, but the most common is your adapter settings.
In some instances, it’s possible that Windows can’t find the Wi-Fi network, and that’s usually caused by a problem with your adapter, so you need to check it.
Many reported that their HP laptop is not connecting to Wi-Fi, and if you encounter this problem, then you should update your drivers.
The most common solutions to dealing with network issues
➡ Check for a faulty connection
A problem with your actual network connection is one of the most common issues, and it can be split into two categories:
- Setup-related issues
As you might expect, not having the correct login details will cause connectivity issues, so it is best to check beforehand that the credentials you used are correct.
If you find that the information you used to log into your network is correct, perhaps your network environment necessitates you to switch from a public to a private network type.
- Physical problems
Regarding the physical part of this issue, a connection that can not be maintained or used properly can include problems with the router, problems with the network card on your device, and even problems with the cables connected to the router/network card.
To check for physical problems, ensure that the router is running optimally and that all the respective lights are turned on.
Furthermore, it would be recommended that you check if the cables are cut, or have any other damage (both to and from your router/ethernet port, etc.).
➡ Check your drivers
As we all know by now, drivers are an essential element to any hardware that we use, bridging the gap between software and the device itself, and having issues with drivers is not going to help.
If this important element is not fully updated, or if the driver gets corrupted, a full re-install should resolve this issue. (more details about this step in the guide below).
➡ Make sure the ISP has a good connection
In some cases, you might find that even if the above-mentioned elements are all ticked without problems, the ISP might have problems with the distribution of the Internet on their network.
To find out if that is the case, you should contact your ISP by phone and ask if everything is running smoothly on their side.
If they don’t report any issues, then it is safe to assume that the issue is local, so let’s dive into the steps you need to follow in order to resolve this annoying problem once and for all.
How can I fix Windows 10 can’t connect to a wireless network?
1. Modify network adapter settings
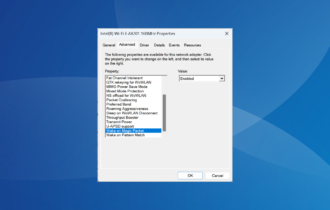
- Change the channel width for your network adapter
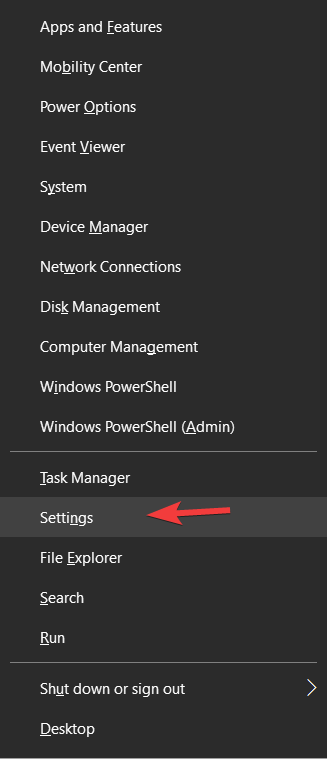
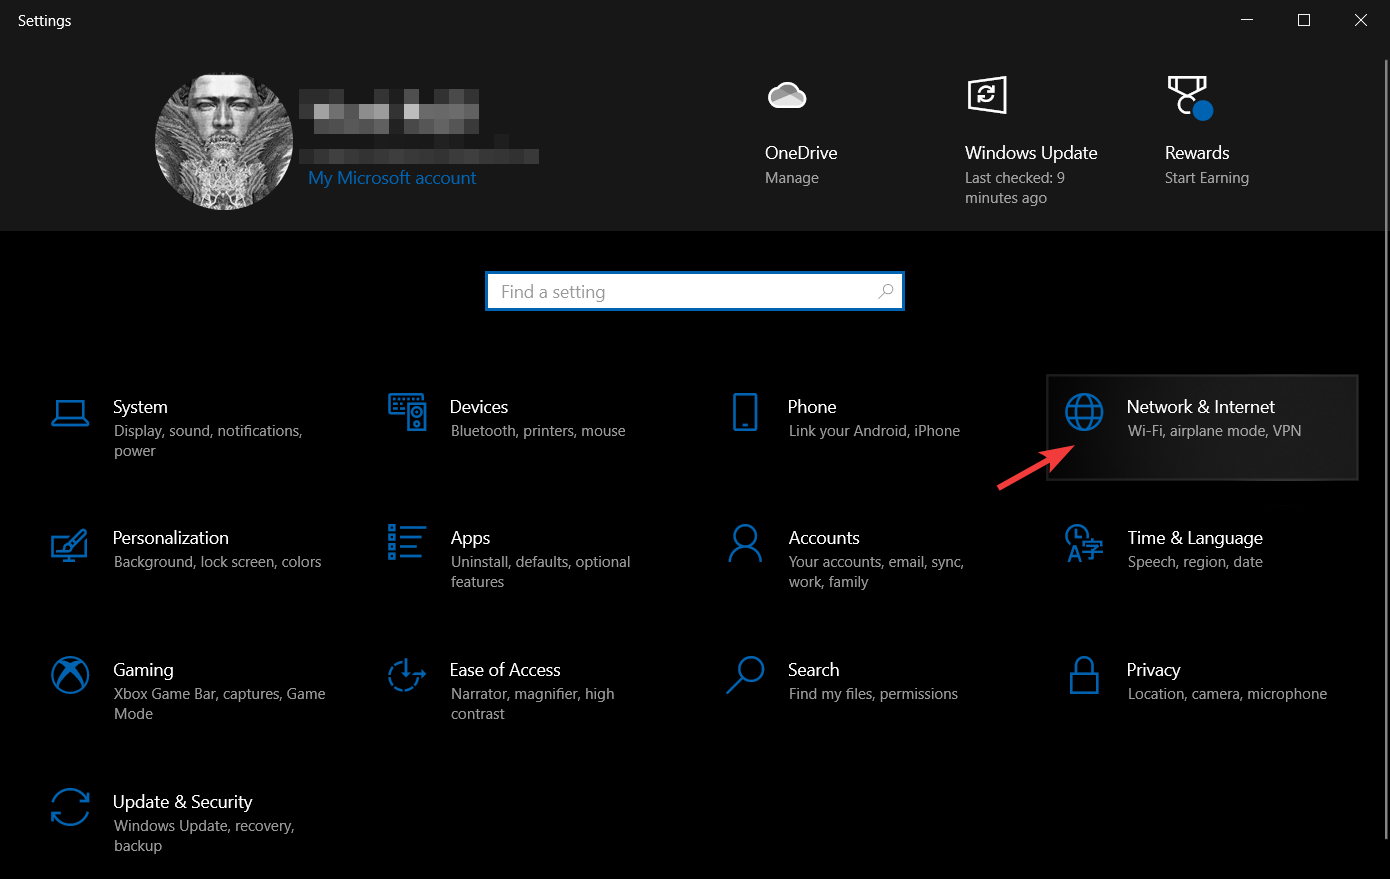
- Press Win Key + X and choose Settings.

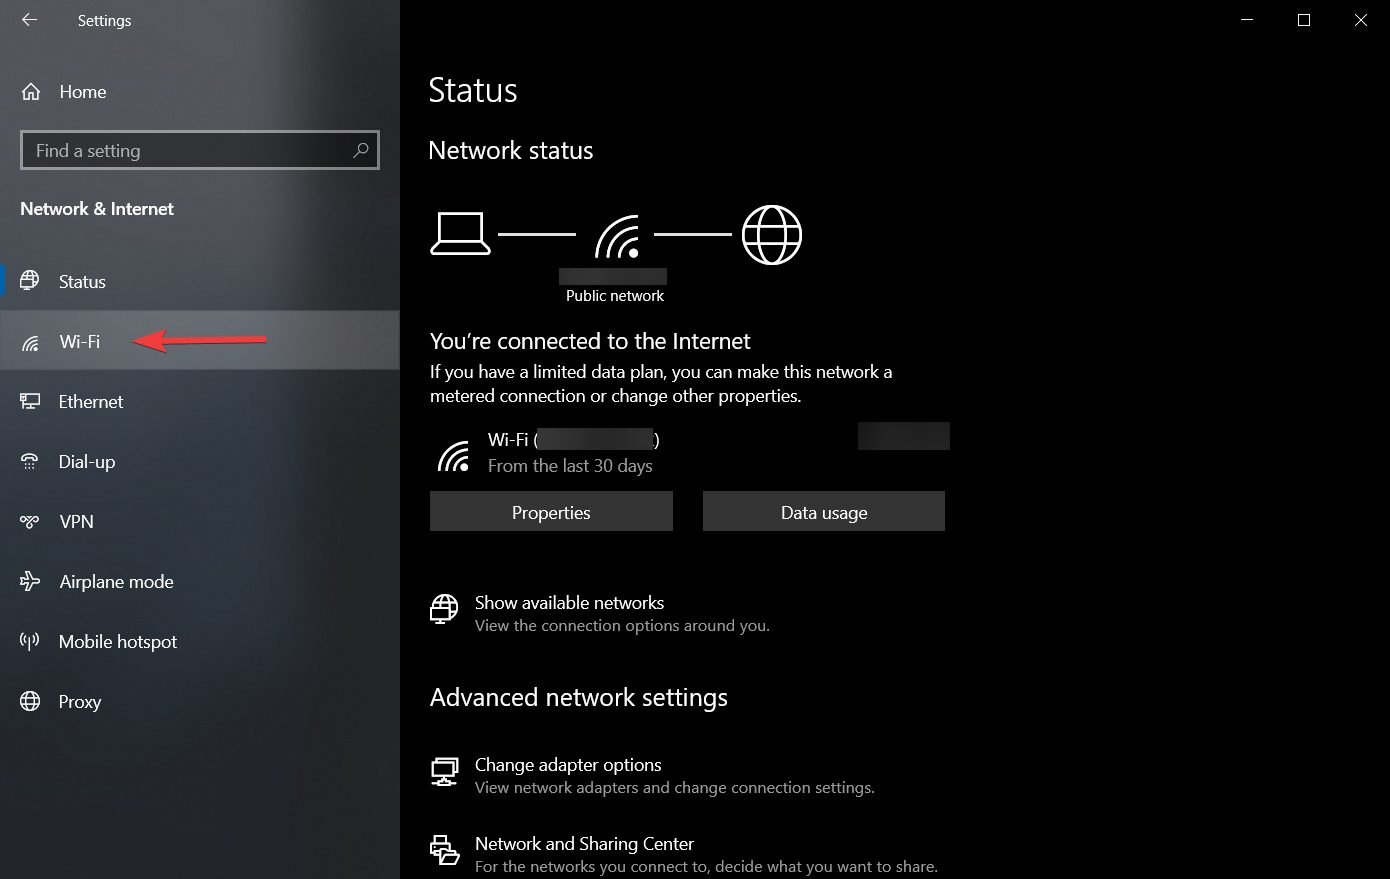
- Choose Network & Internet.

- Click Change adapter options.
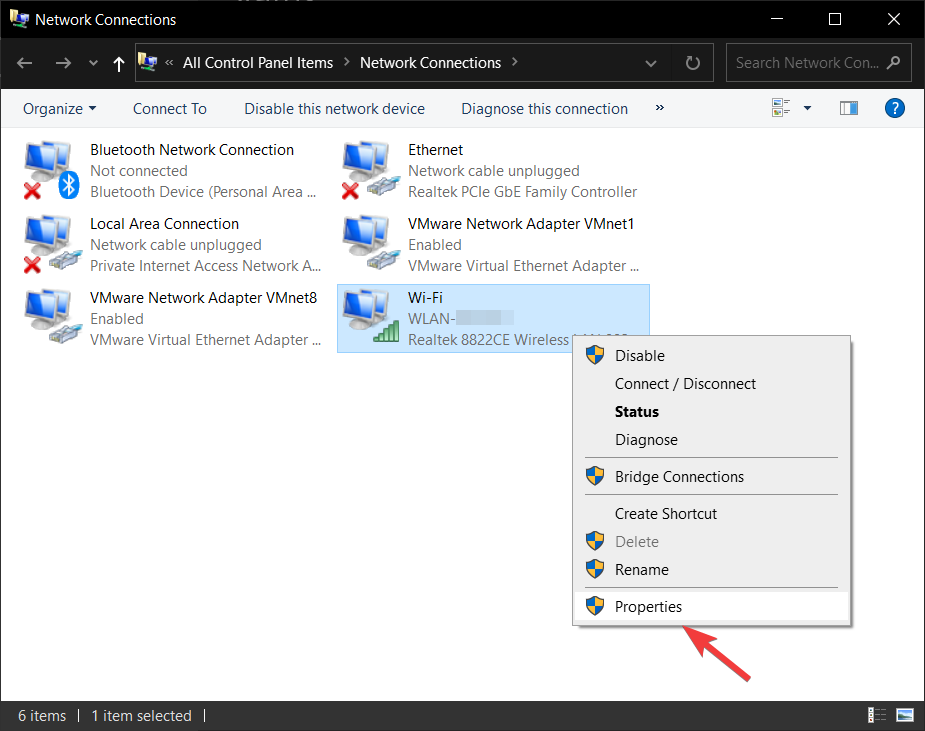
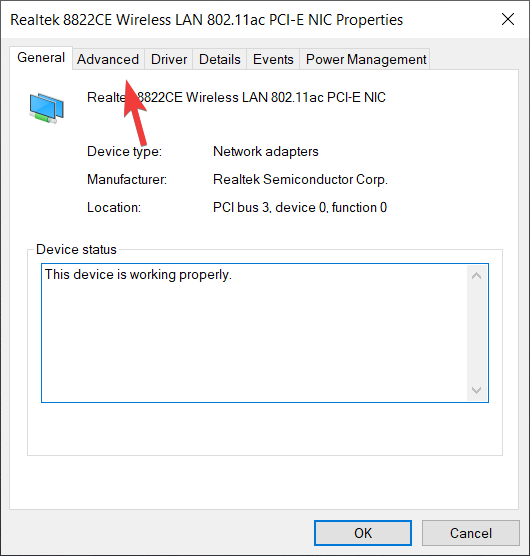
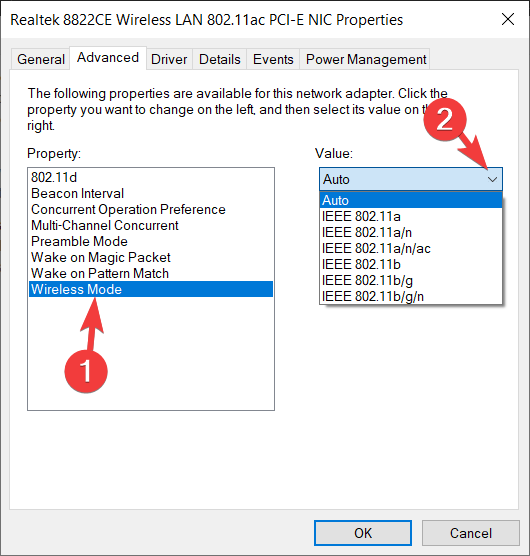
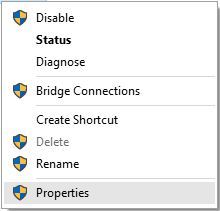
- Locate your wireless adapter and right-click it. Choose Properties from the menu.

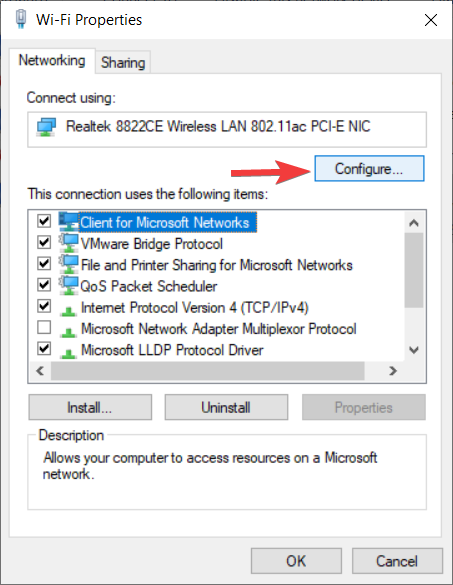
- Click the Configure button.

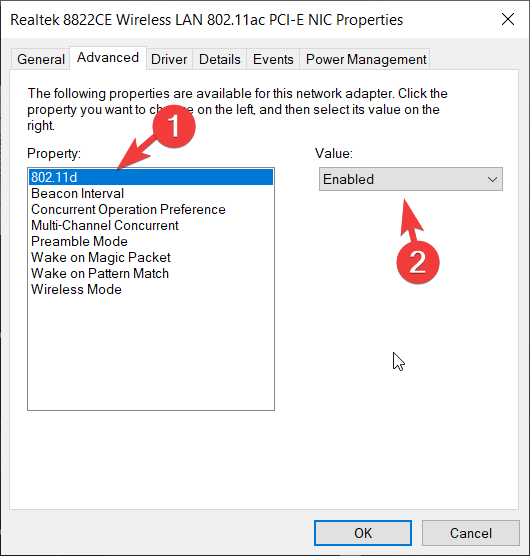
- Choose the Advanced tab.

- Select the 802.11d from the Property list and set the value to Enabled.
- Click OK to save the changes.

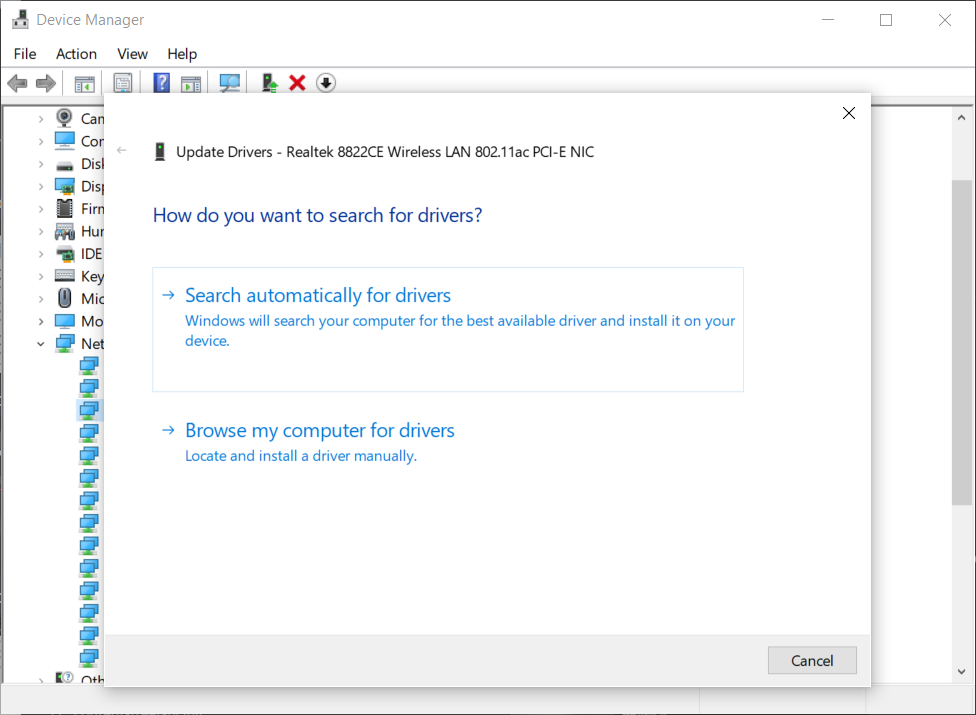
- Update your network adapter driver manually
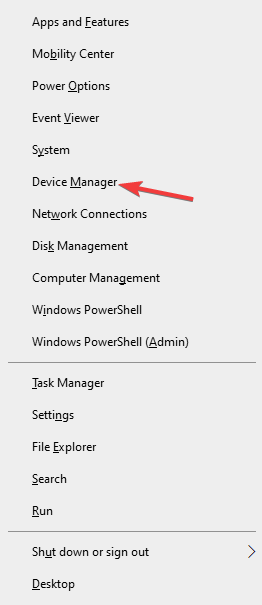
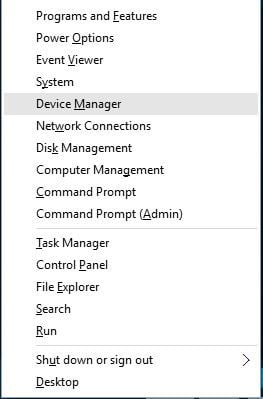
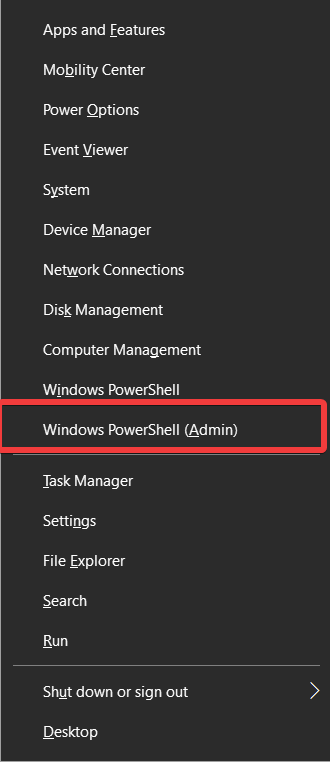
- Press the Win Key + X, and choose Device Manager from the list.

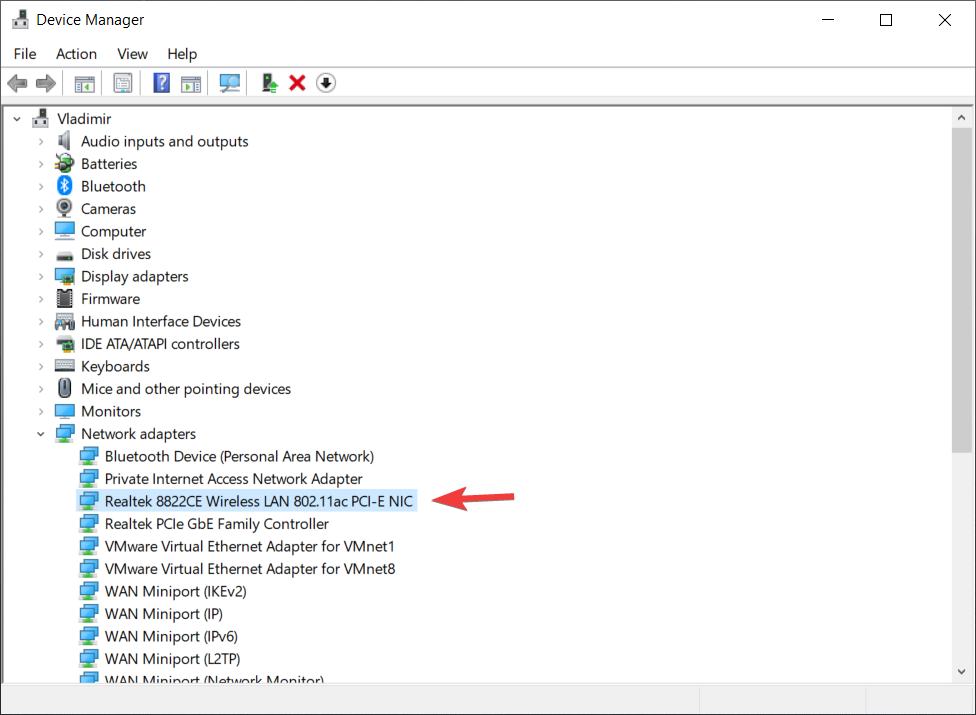
- Under the Network adapters dropped-down, find the wireless network adapter in the list (The exact name will depend on your system configuration).

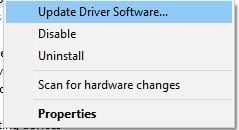
- Right-click it and choose Update Driver Software.

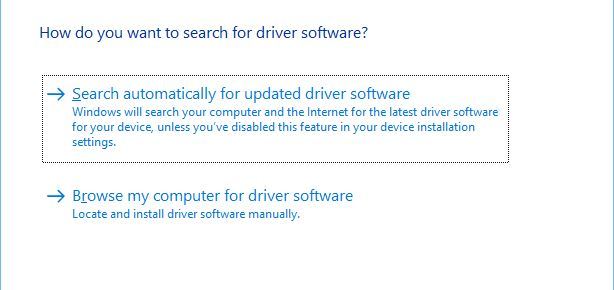
- Click Browse my computer for driver software.

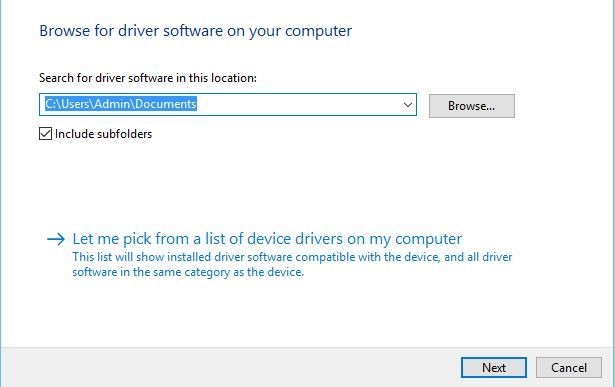
- Now click on Let me pick from a list of device drivers on my computer.

- Make sure that Show compatible hardware is not checked.

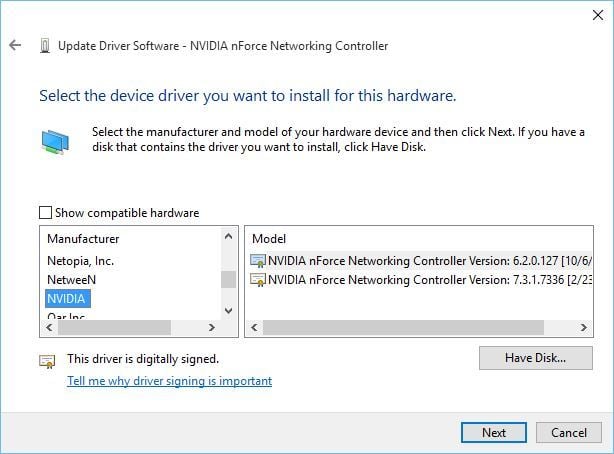
- Find your network adapter manufacturer and select the driver you wish to install.
- After you’ve installed the driver, restart your computer.
Did you know that you can update drivers automatically? Updating drivers manually can be tedious and a bit hard to follow, but there’s a way to automate this process.
By using specialized driver updater software like Outbyte Driver Updater, you can automatically update all drivers on your PC with just a few clicks.
- Make sure that your adapter and router are using the same security type
In order to protect your data, wireless connections come with certain security types such as WPA2-PSK (AES) or WPA-PSK (AES).
For your network connection to work correctly, your router and computer must use the same security type.
You can set the security type for your router by following the instructions from your router’s instruction manual.
After you’ve set a specific security type on your router, you need to check if the same security type is also being used on your computer.
To do that, you need to follow these steps:
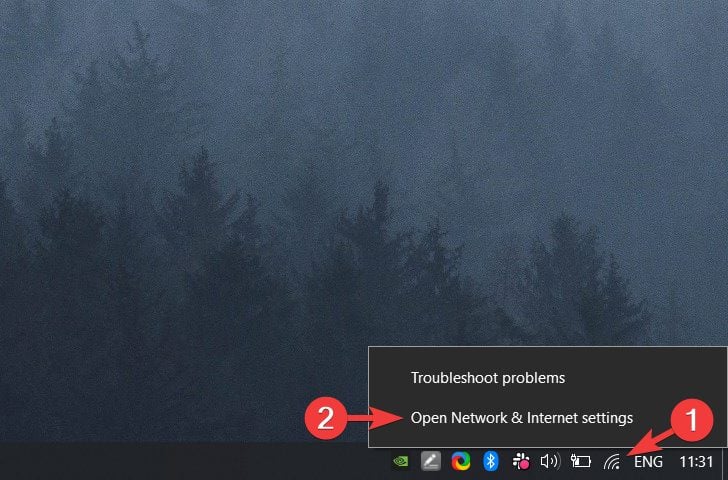
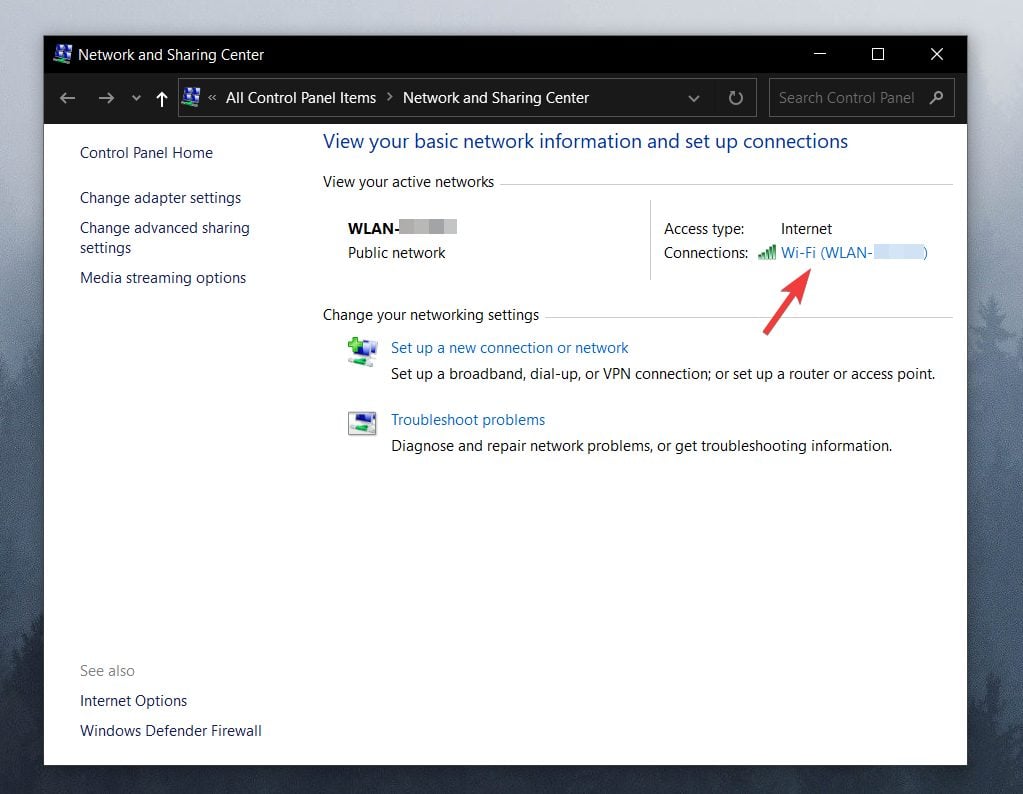
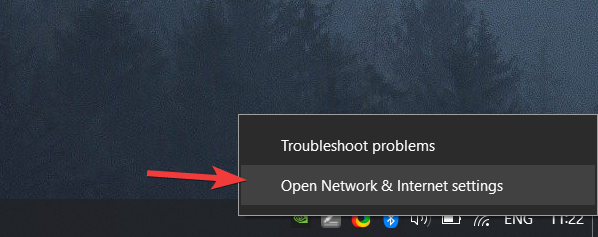
- Right-click the network connection icon next to your clock, and choose Open Network & Internet settings.

- Choose Network and Sharing Center.
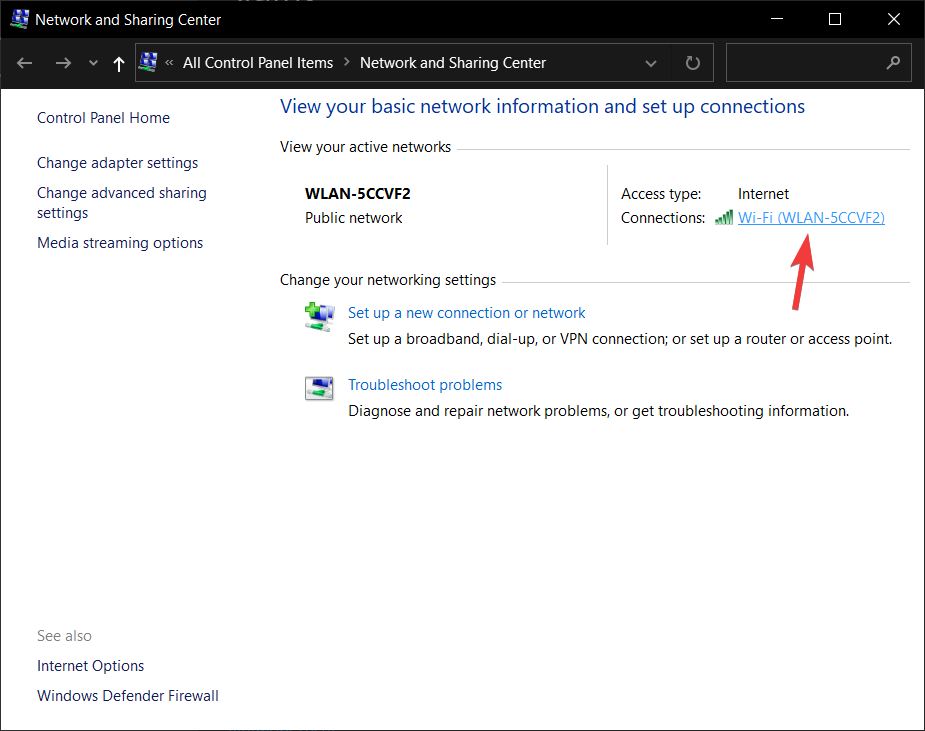
- Click on your connection link.

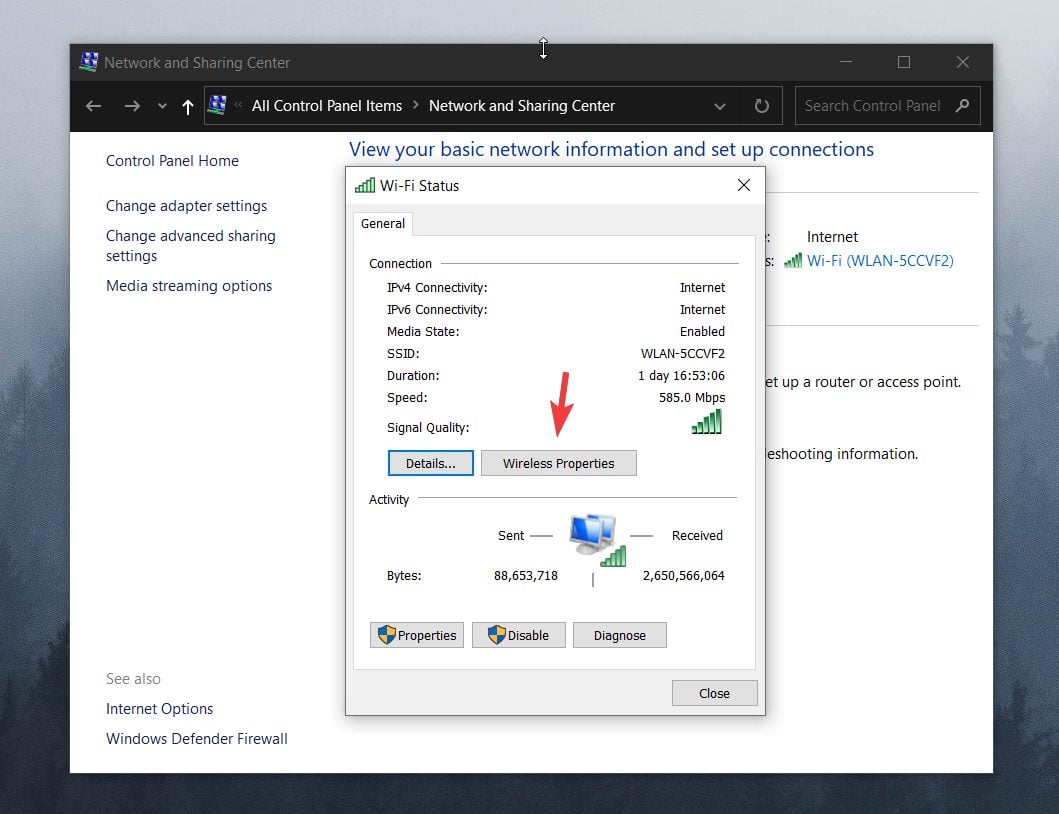
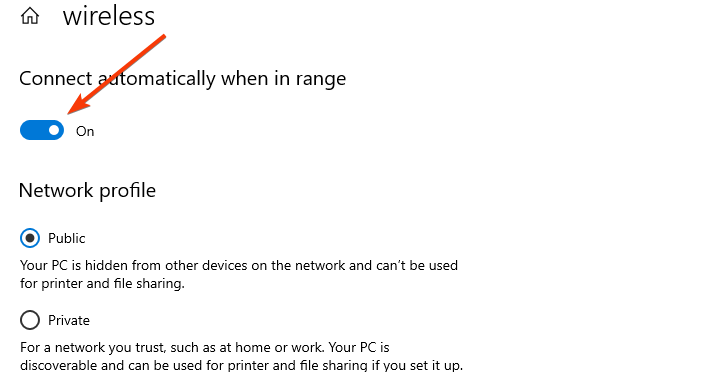
- Choose Wireless Properties.

- In the Security tab, you should see your connection security type.

- After choosing the correct one, simply click OK.


 NOTE
NOTE
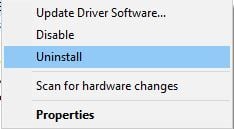
- Uninstall your network adapter
- Press Win Key + X and choose Device Manager from the list.

- Locate your network adapter and right-click it.
- Choose Uninstall. (If asked, check to Delete the driver software for this device and click OK.)

- After the driver has been uninstalled, restart your computer and Windows 10 will automatically install the new driver.
If you find that Windows didn’t install the drivers automatically after the restart process, follow these steps.
- Change your network adapter
If nothing else works, maybe you should change your network adapter.
Certain USB Wi-Fi adapters aren’t compatible with Windows 10, and if that’s the case, you might have to replace your current adapter with a newer model.
2. Modify Internet properties settings
- Change the wireless network mode
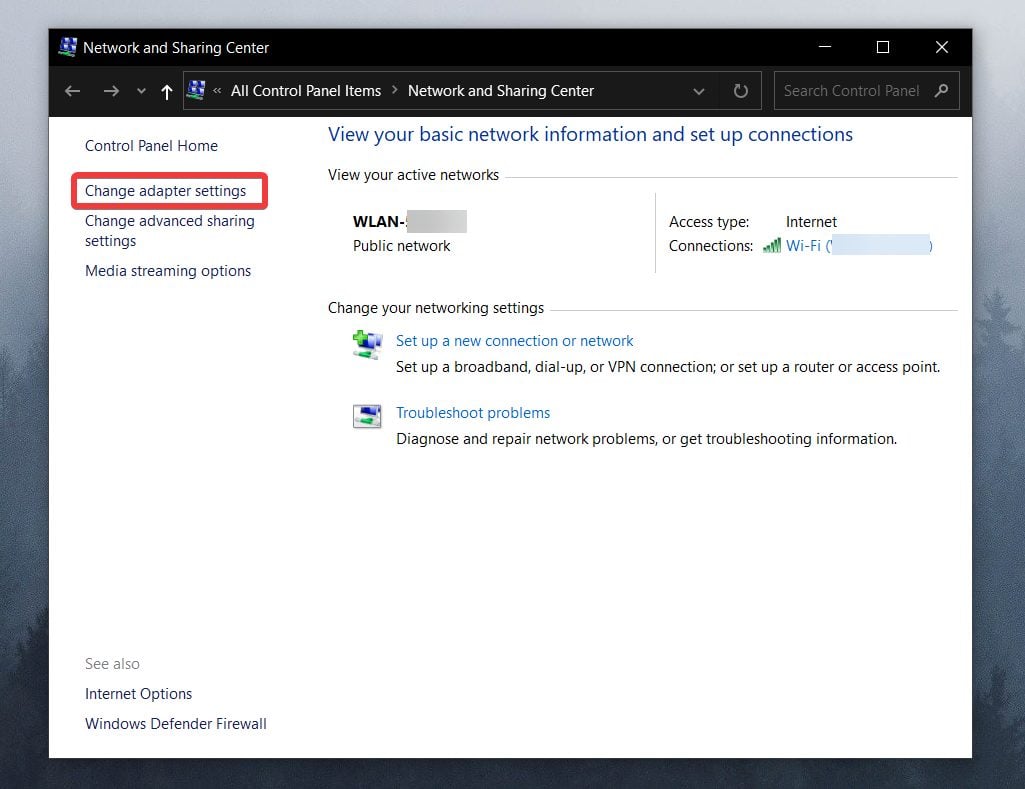
- Right-click the network connection icon from the taskbar and choose Open Network & Internet settings.
- Choose Network and Sharing Center.
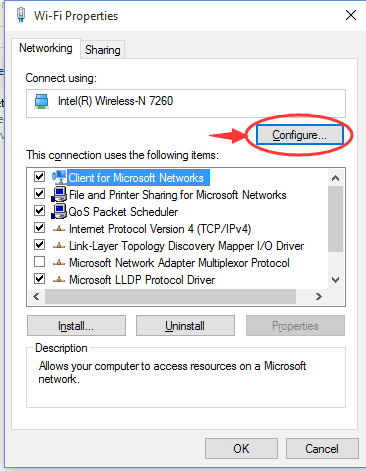
- Click Change adapter settings, locate your wireless network adapter, right-click it and choose Properties from the menu.

- When the Properties window opens, click the Configure button.

- Go to the Advanced tab.
- Select Wireless mode from the Property list and modify its value from the drop-down menu. (In most cases IEEE 802.11b/g should work, but if it doesn’t, try experimenting with different options.)
- Press OK.

You can change the wireless network mode for your router and your wireless adapter. In order for your network to work, your router and network adapter need to use the same or similar network mode.
If you want to change the network mode of your router, you’ll need to check the instruction manual, but in most cases, it won’t be necessary to change the wireless network mode on your router.
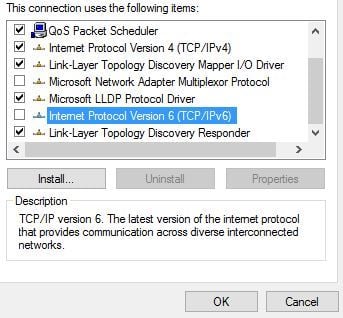
- Disable IPv6 on your computer and router
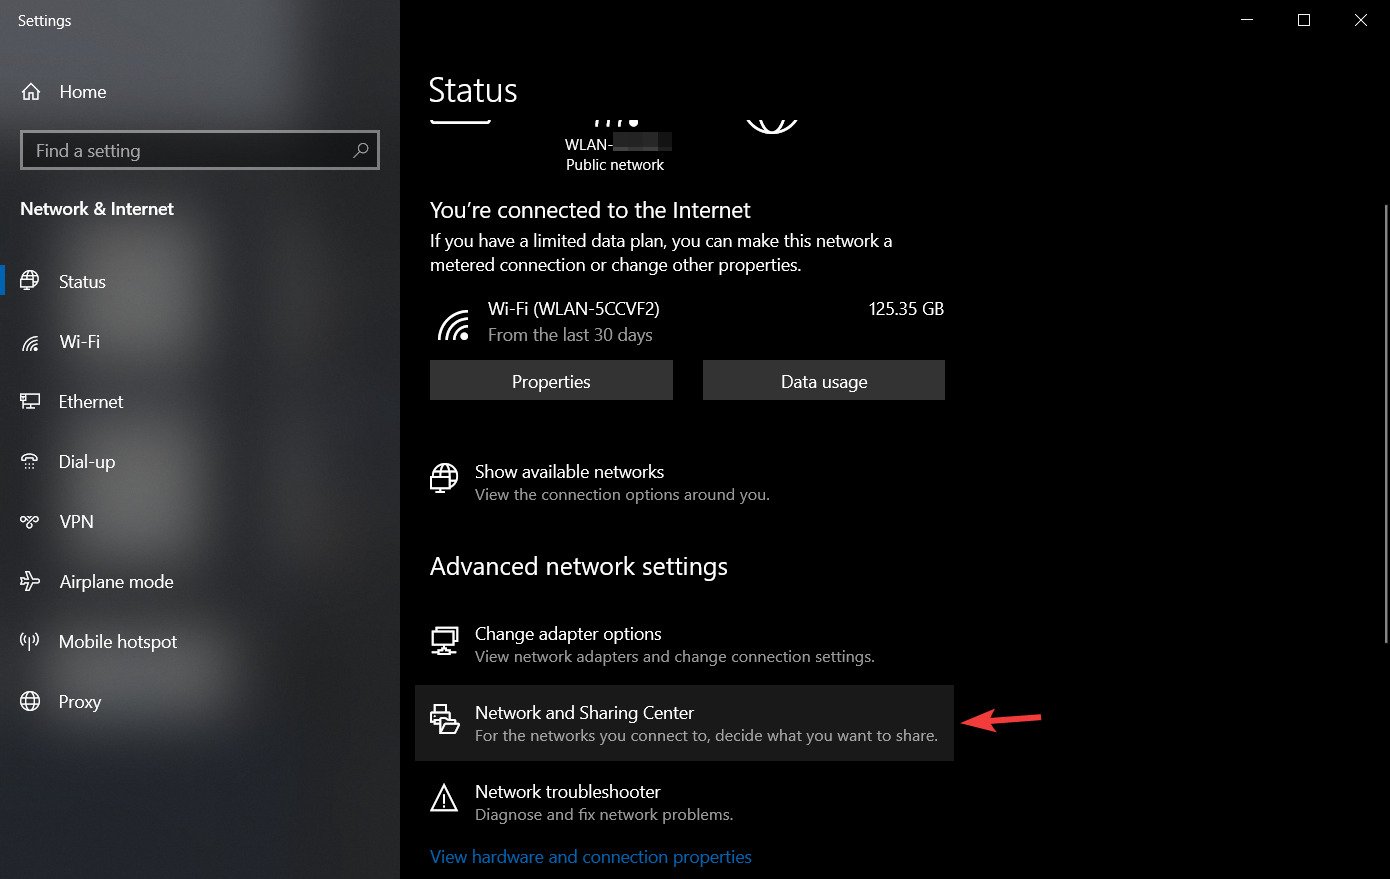
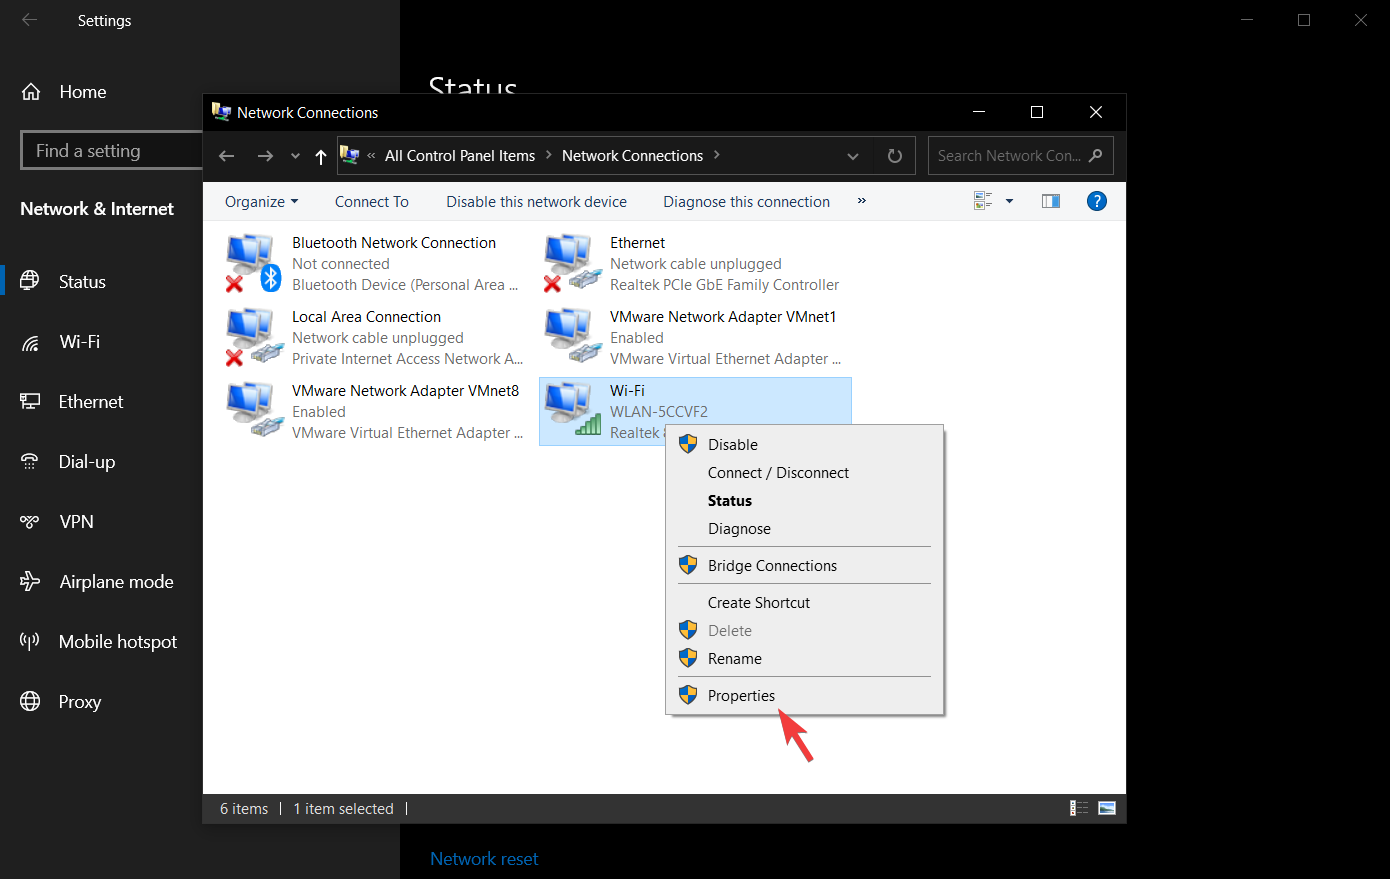
- Open Network & Internet settings by right-clicking your network icon in the taskbar.

- Click the Network and Sharing Center option.
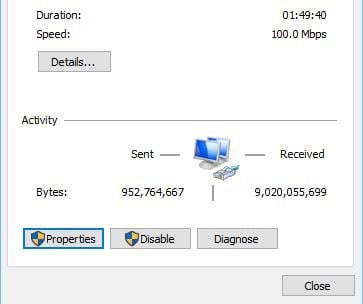
- Click on your current connection.
- In the Connection status window, click the Properties button.

- Find Internet Protocol Version 6 (TCP /IPv6) and uncheck it.

- Click OK button to save the changes.
- Restart your computer in order to apply the changes.
If the problem still persists, you might have to disable IPv6 on your router.
Disabling IPv6 on your router is a complicated process, and it’s different for every type of router, so before you do that, check your router’s instruction manual.
If you encounter any issues or if your network protocol is missing, be sure to check out this guide that will help you get back on track.
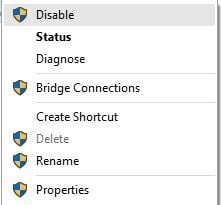
3. Manage wireless connections
- Disable and enable your wireless connection
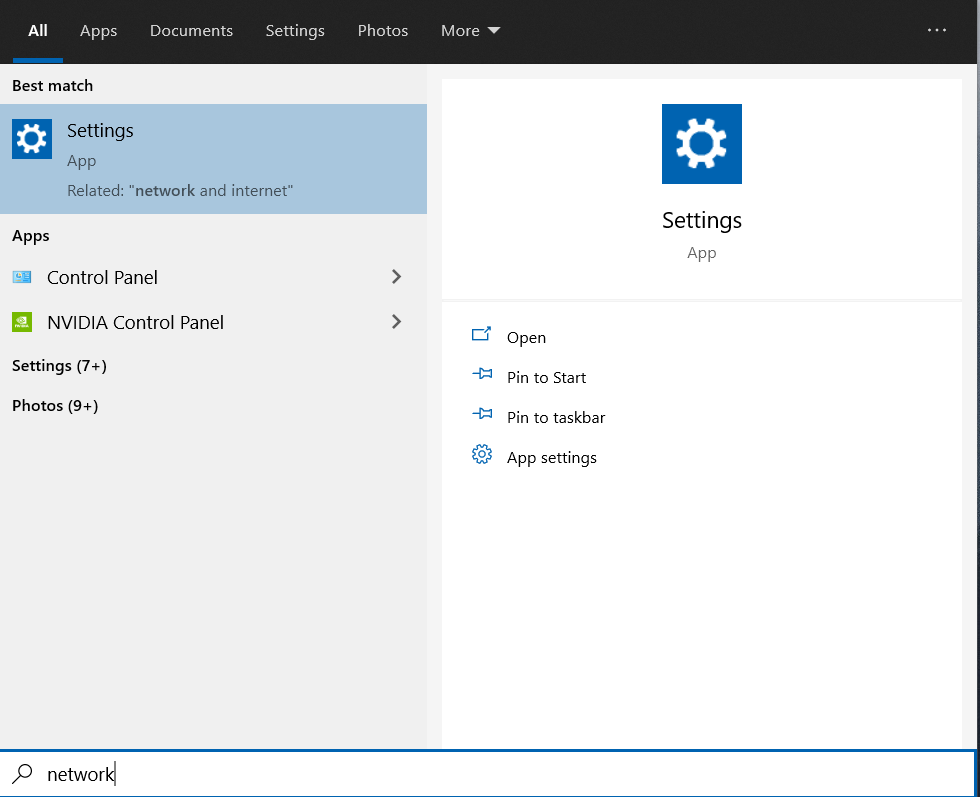
- Click the search button and input Network.
- Choose Settings from the list.

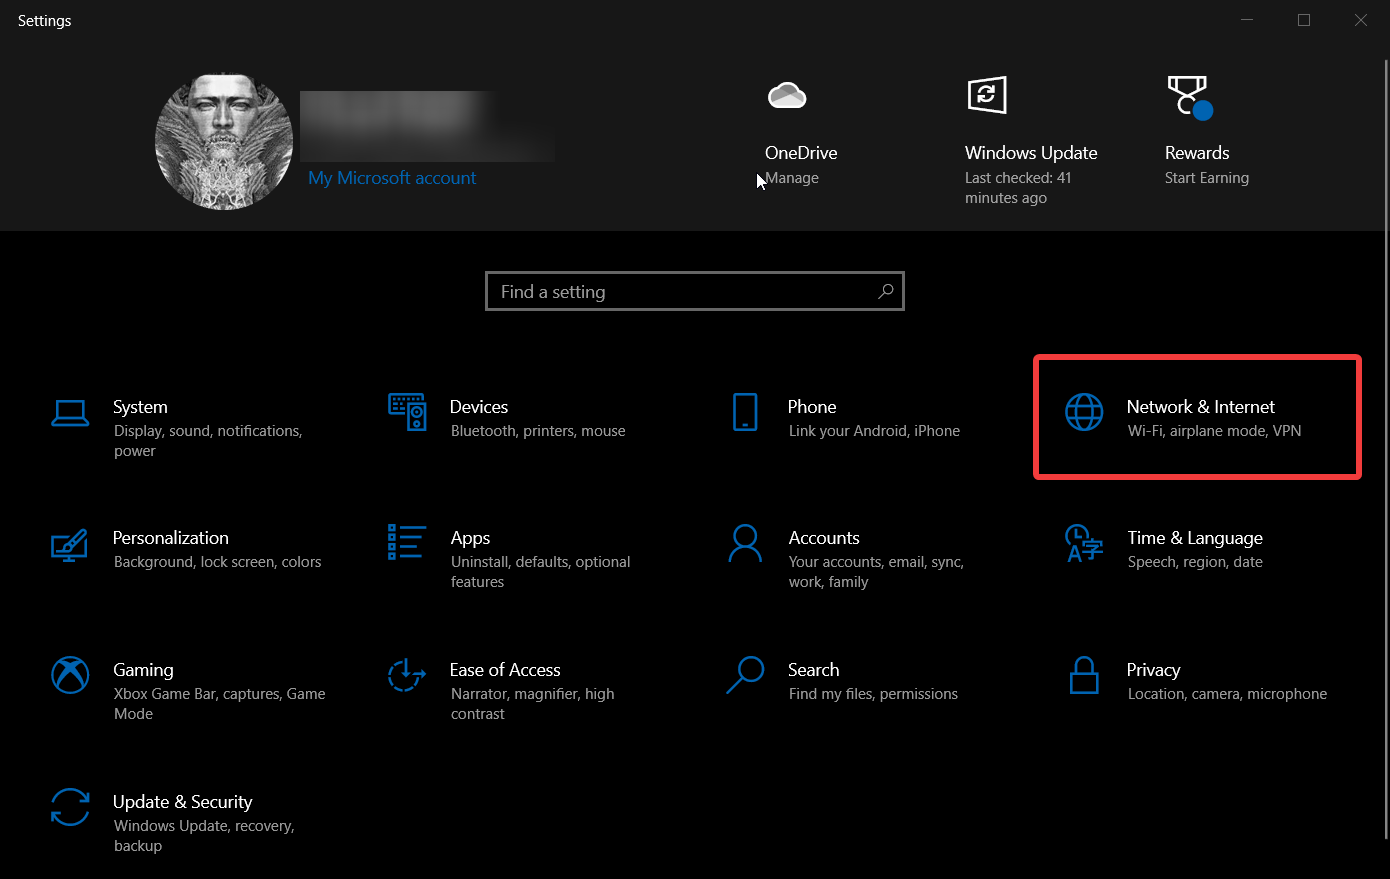
- Choose Network & Internet.
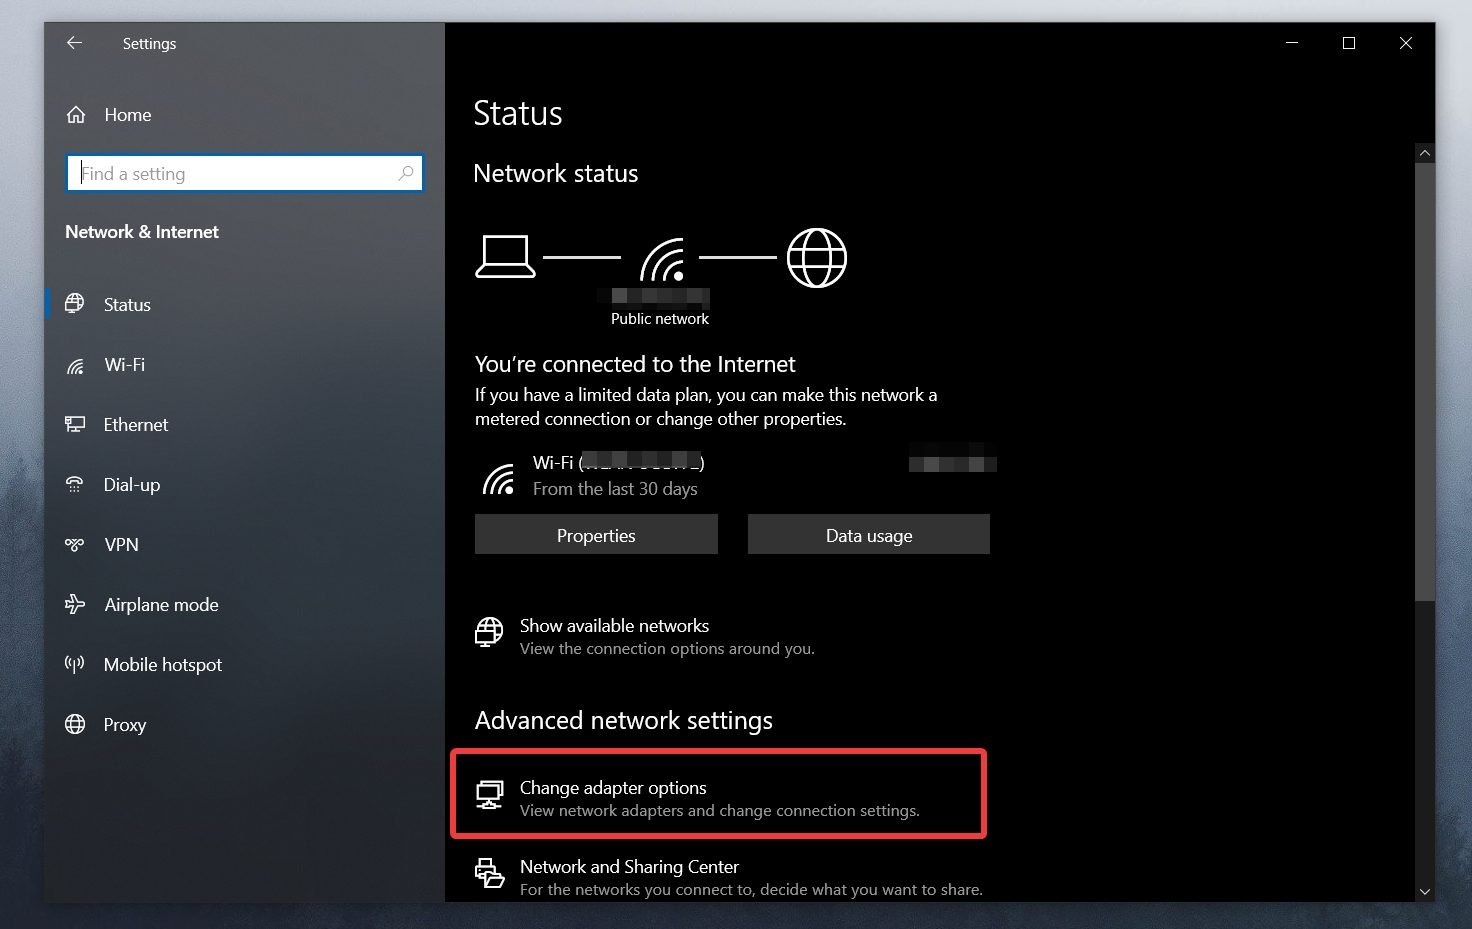
- Click Change adapter options.

- Locate your wireless connection, right-click it and choose Disable.

- Right-click the same connection again and choose Enable.
- Forget the wireless connection
- Press Win + X keys and click on Settings.

- Navigate to Network & Internet.
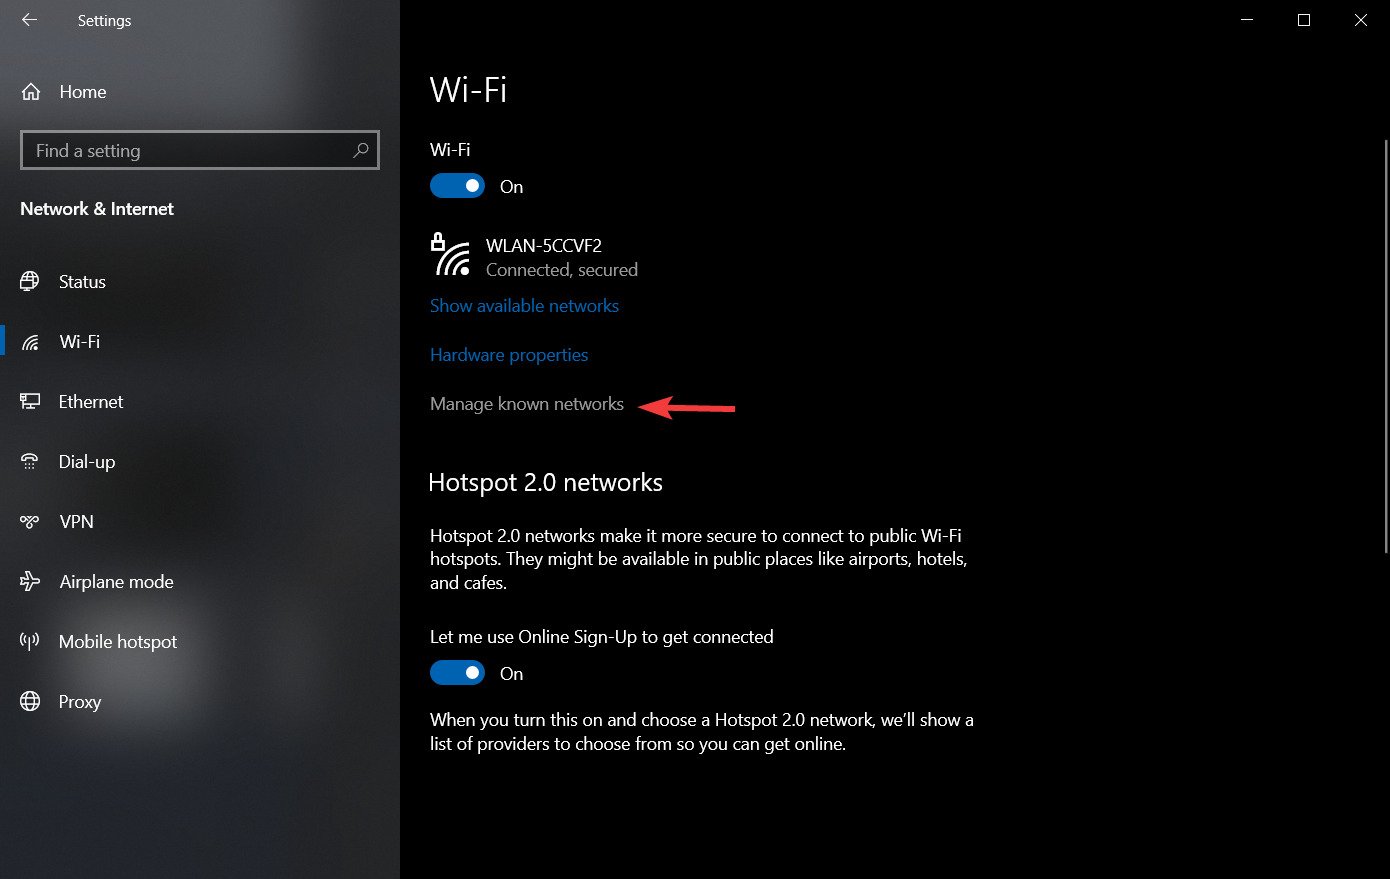
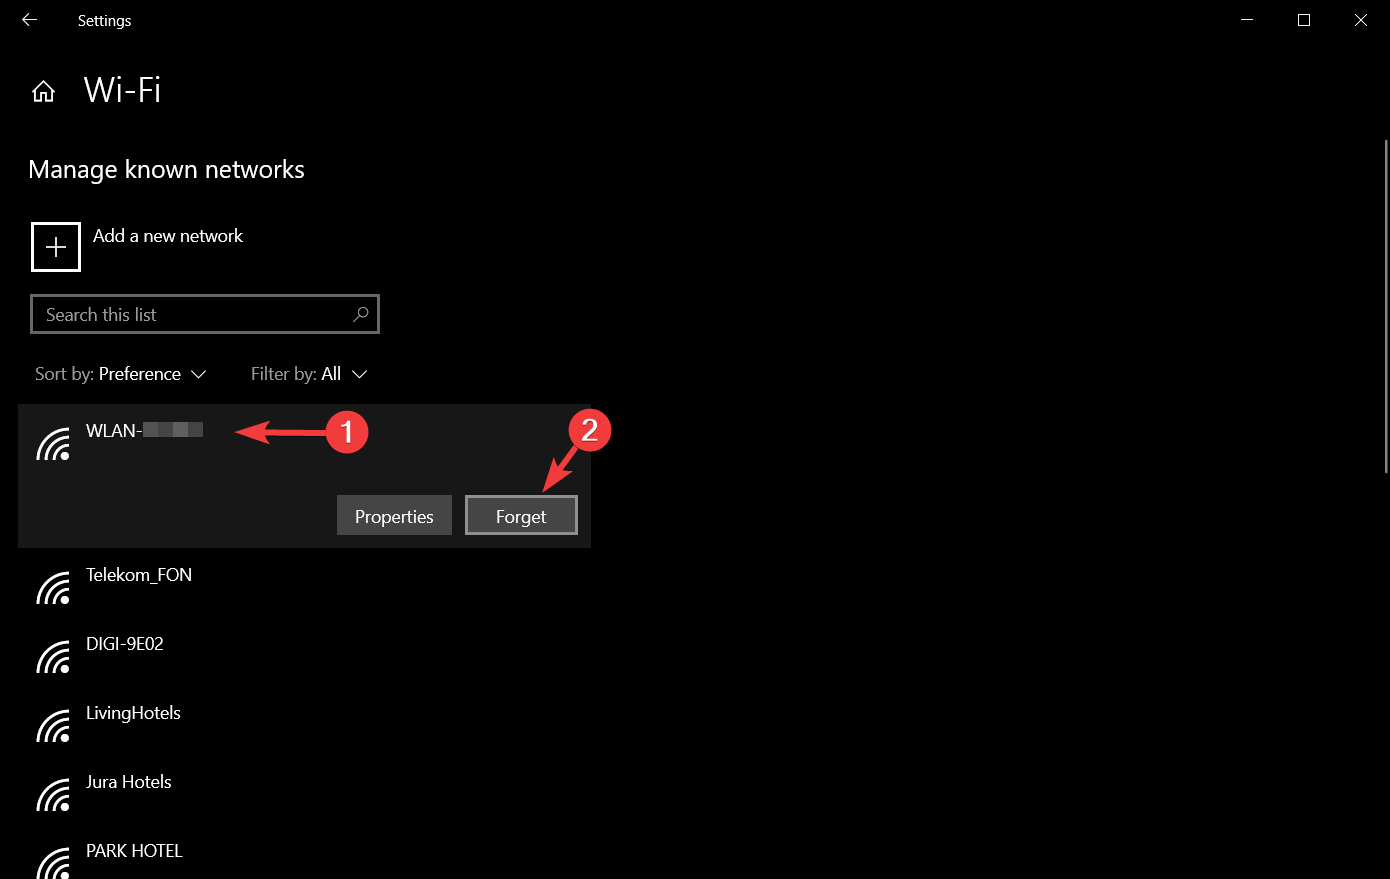
- Go to Wi-Fi section.
- Click on Manage known networks.
- Select your Wireless network and click Forget.
- After you’ve done that, connect to the same wireless network again.
- Add the connection manually
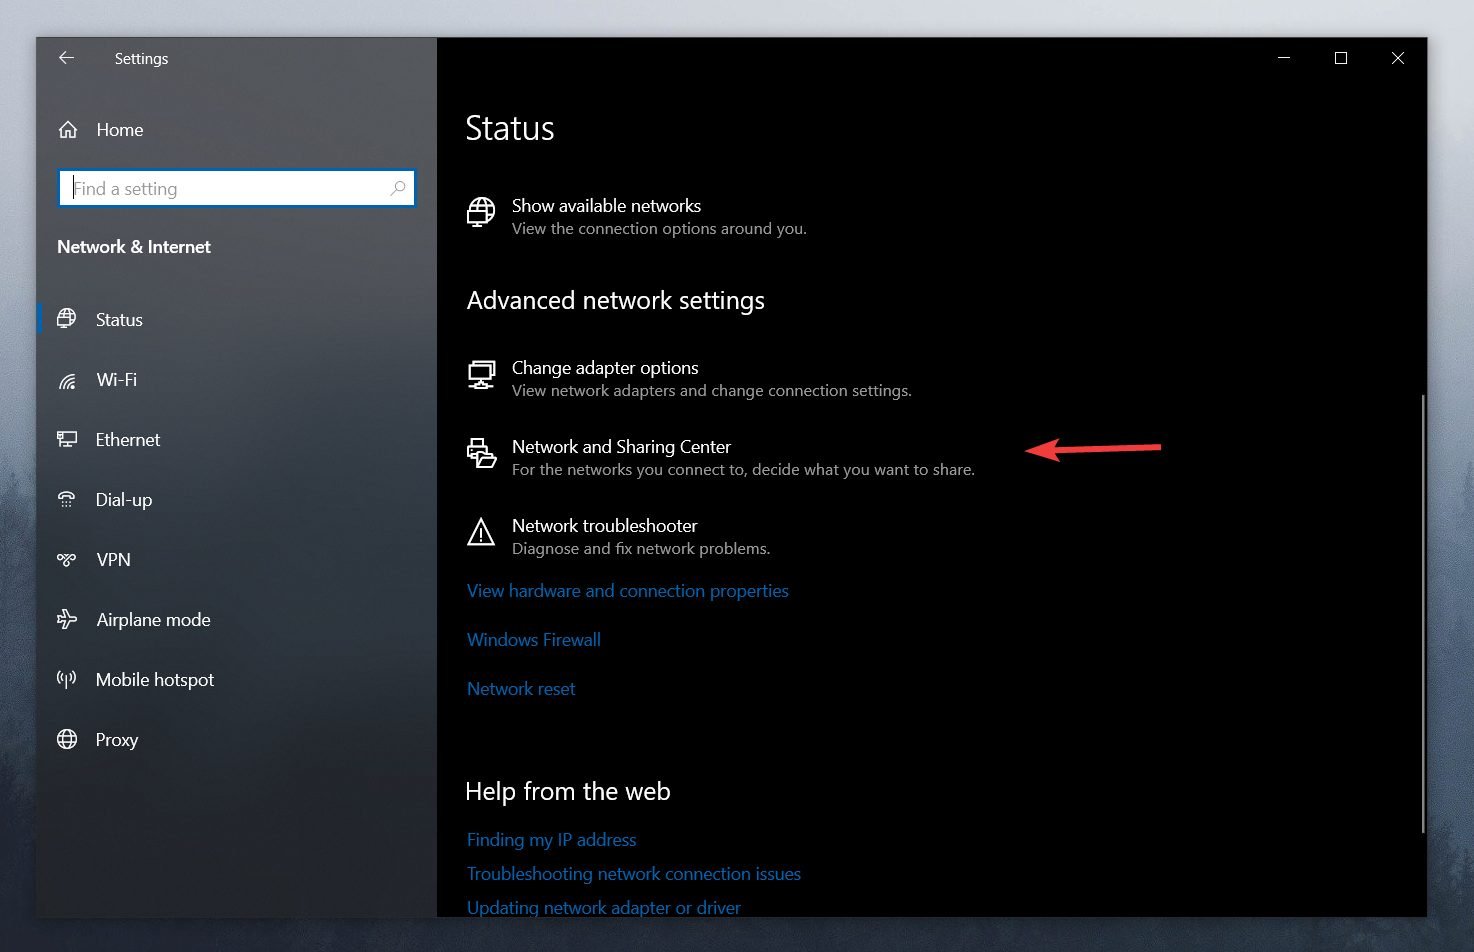
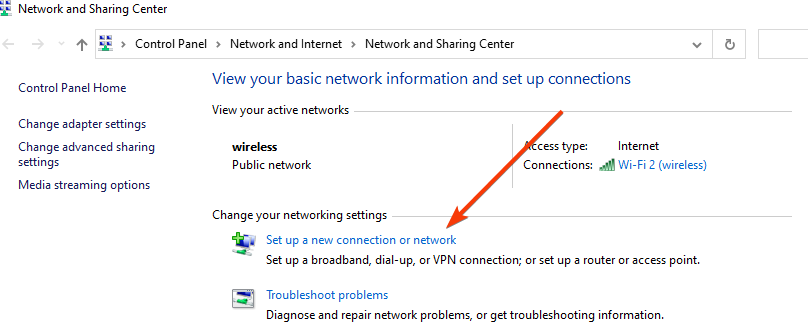
- Right-click the network icon next to your clock.
- Choose Open Network & Internet settings.
- Open the Network and Sharing Center.

- Click Set up a new connection or network.

- Choose Manually connect to a wireless network and click Next.
- Enter the requested information such as network name, security key, and security type.
- Click Next to finish the process.
After you’ve created a new network connection, everything should be working without any problems. If the issue persists, try changing the security type of your new network.
- Use ipconfig /release command
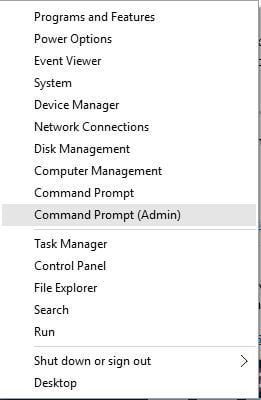
- Press the Win Key + X and from the list choose Command Prompt (Admin).

- When Command Prompt starts, enter the following lines and after each line press Enter to run it:
ipconfig /releaseipconfig /renew
- Close Command Prompt and try to connect to the network again.
It is possible that in some instances you won’t be able to run Command Prompt with admin rights but the solution for this issue is pretty straightforward.
Windows 10 can’t connect to this network after an update
1. Use Command Prompt
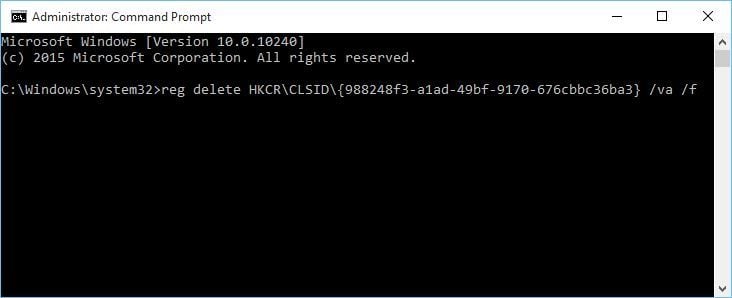
- Press Win Key + X and choose Command Prompt (Admin) or the PowerShell (Admin) equivalent.

- When Command Prompt starts, type the following and press Enter to run it:
reg delete HKCRCLSID{988248f3-a1ad-49bf-9170-676cbbc36ba3} /va /f

- Now enter the following line and press Enter to run it:
netcfg -v -u dni_dne
- Close Command Prompt and restart your computer.

2. Uninstall the antivirus software
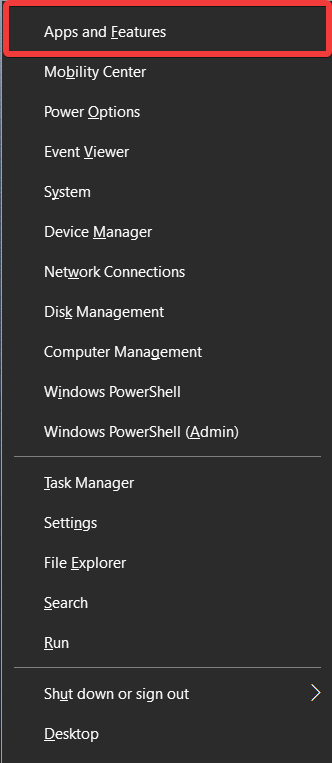
- Press the Win Key + X and choose Apps and features.

- Locate your antivirus software and click Uninstall.
- Restart your computer.
For Norton users, there’s this complete guide to uninstall the antivirus. Also, there’s a similar uninstall guide regarding McAfee.
If your network connection starts working, you can install your antivirus software again, making sure to allow the Internet connection through the settings of the app.
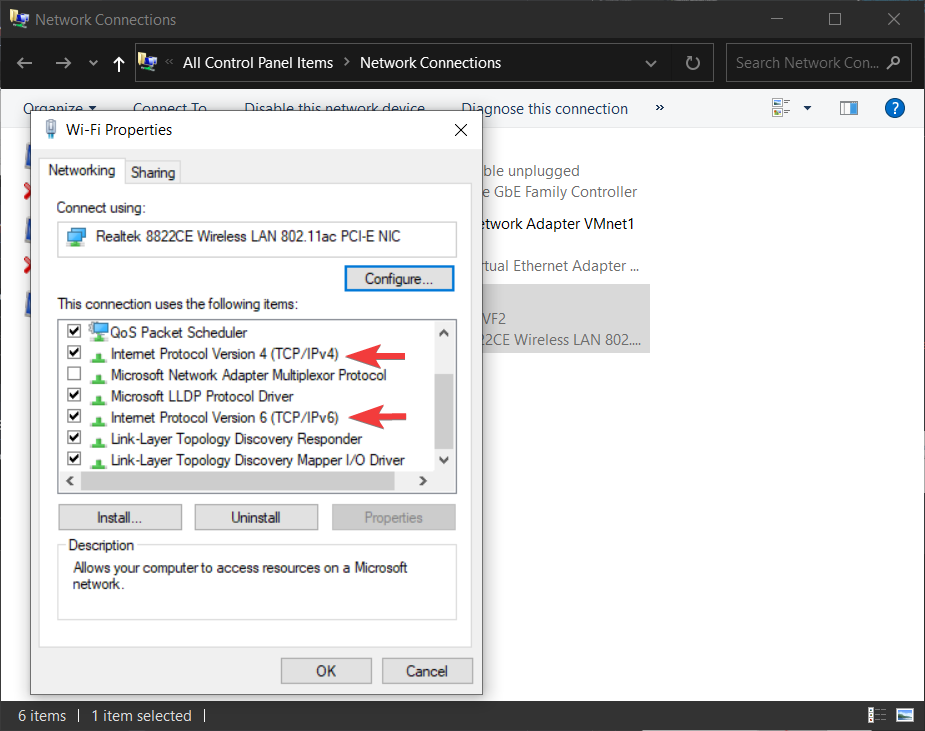
3. Check if IPv4 and IPv6 protocols are enabled
- Right-click the network icon next to your Windows clock and click Open Network & Internet settings.
- Choose the Network and Sharing Center.
- Click Change adapter options.
- Find your adapter, right-click it and choose Properties.
- Make sure that IPv4 and IPv6 protocols are enabled.
- Click OK and check if the issue has been resolved.
Some users might find that they can’t access the IPv4 proprieties, but there is a simple fix for this problem.
Windows 10 can’t connect to this network, enter APN and try again
This error occurs when trying to use your Windows 10 device to connect to a cellular network, and will stop you from accessing data altogether.
To eliminate the possibility of having network issues that stem from your PC, follow these steps:
- Connect your PC to an Ethernet or Wi-Fi network.
- Open a browser and check to see if web pages are loading.
- If the Internet is connected, then contact your mobile ISP and ask for APN credentials.
- Use the credentials to sign into the mobile network.
If the Internet doesn’t connect through Ethernet or Wi-Fi, then it is safe to assume that your PC is not set up properly. To resolve this, follow the other methods described in this guide.
Windows 10 can’t connect to this network, and WEP problems
We have already covered how to create a wireless connection manually in this article, but to connect to the network that uses WEP security, you have to set the Security type to WEP for your new connection.
Follow these steps to do so:
- Right-click the network connection icon and click on Open Network & Internet settings.
- Choose Network and Sharing Center from the menu that appears.
- Click on the link of your Internet connection.
- Click on the Wireless Properties button.
- Open the Security tab, and choose WEP as your network security type.
- Click OK.
We should also mention that the WEP security type isn’t the safest, and it’s advised that you switch to the WPA2 security type.
Windows 10 can’t connect to the network after waking from Sleep Mode
1. Disable IPv6 / Change Power Management settings
We have already explained how to disable IPv6 in this article, under the Modify internet properties settings solution.
If you’re getting Windows 10 can’t connect to this network message after your computer wakes up from Sleep Mode, you need to do check the Power Management settings for your adapter.
To do that, follow these steps:
- Press Win Key + X and open the Device Manager.
- Navigate to the Network Adapters section.
- Locate your wireless adapter and right-click it. Choose Properties from the menu.

- Navigate to the Power Management tab.
- Uncheck Allow the computer to turn off this device to save power and save the changes.


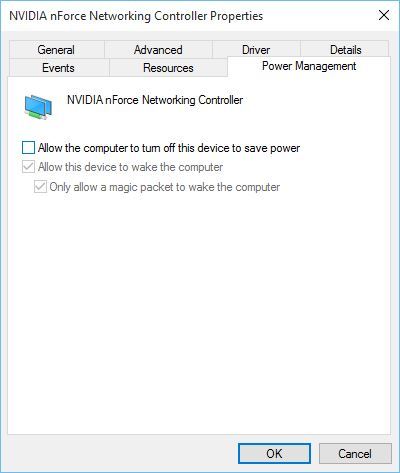
If you use a USB network adapter, you’ll have to repeat this step for all USB devices in Device Manager.
After doing this, if your PC won’t recognize the USB devices, there are a few great solutions to apply.
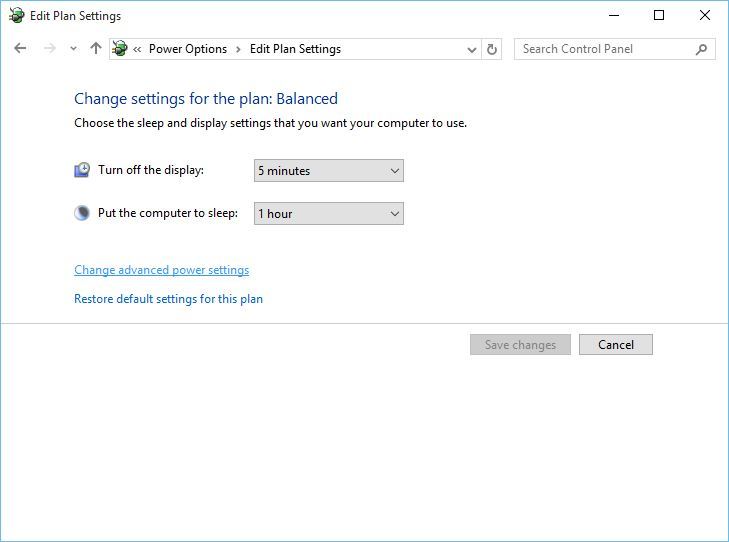
2. Change Power Options
- Press Win Key + S and type Power.
- Open the Power & Sleep settings.
- Click the Additional power settings link from the Related settings section.
- Find your selected power plan and click the Change plan settings.

- Now click Change advanced power settings.

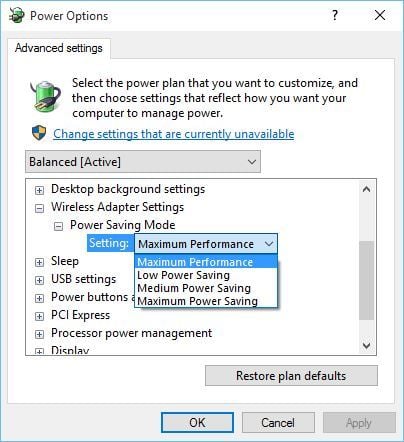
- Navigate through the list and go to Wireless Adapter Settings, and choose Power Saving Mode.
- Change its Setting to Maximum Performance and save the changes.

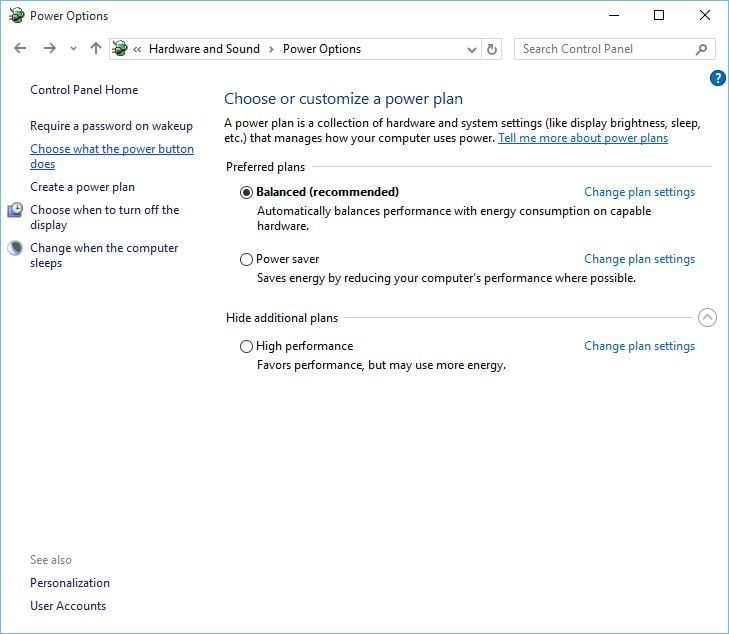
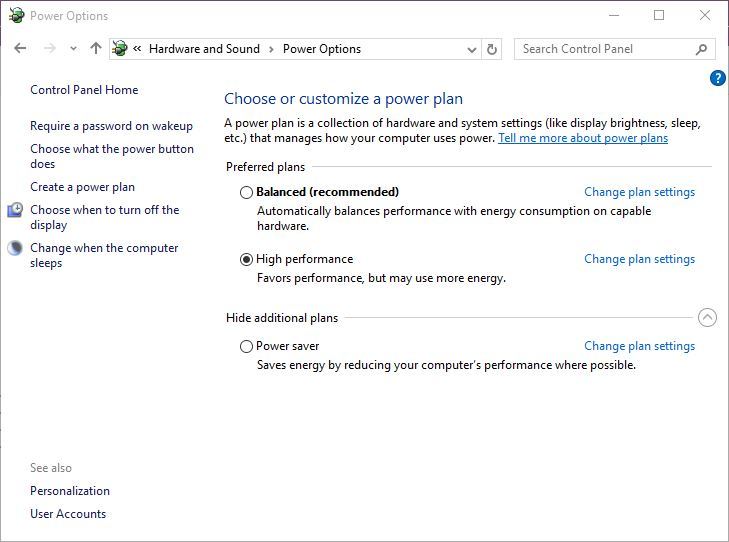
If this solution doesn’t work, you can also try changing your power plan to High Performance. To do that, follow these steps:
- Open Power Options.
- Select the High-performance power plan.
- Click OK to apply the settings.
Some users have stated that their power plan settings are completely missing, and there are few fixes you can try if that is the case.
3. Turn off the Connect to Wi-Fi hotspots option
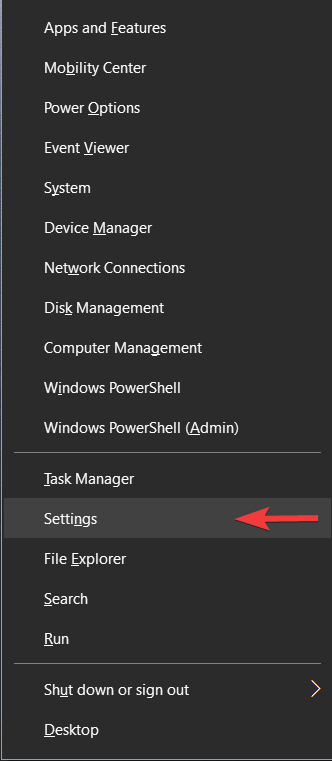
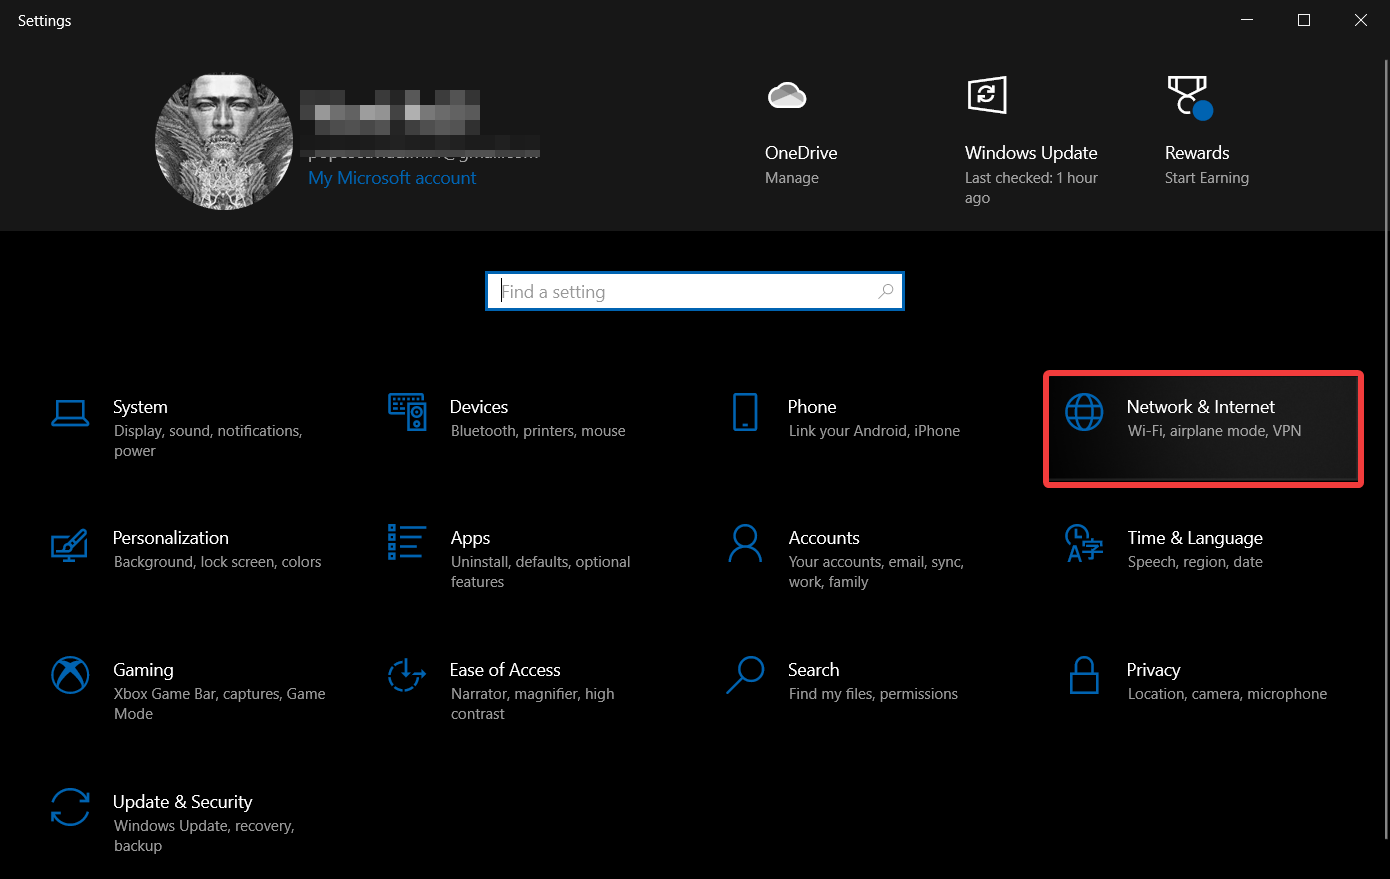
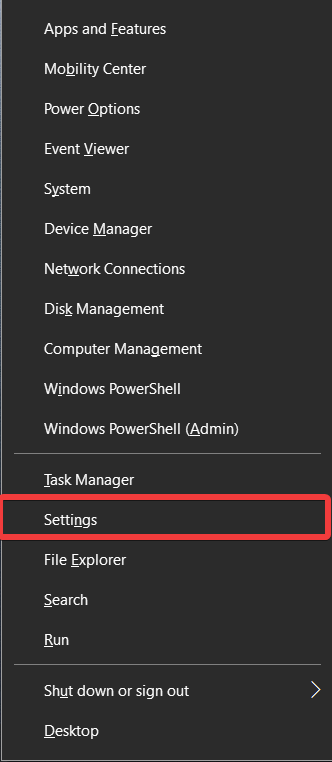
- Press Win Key + X and open Settings.

- Navigate to Network & Internet.
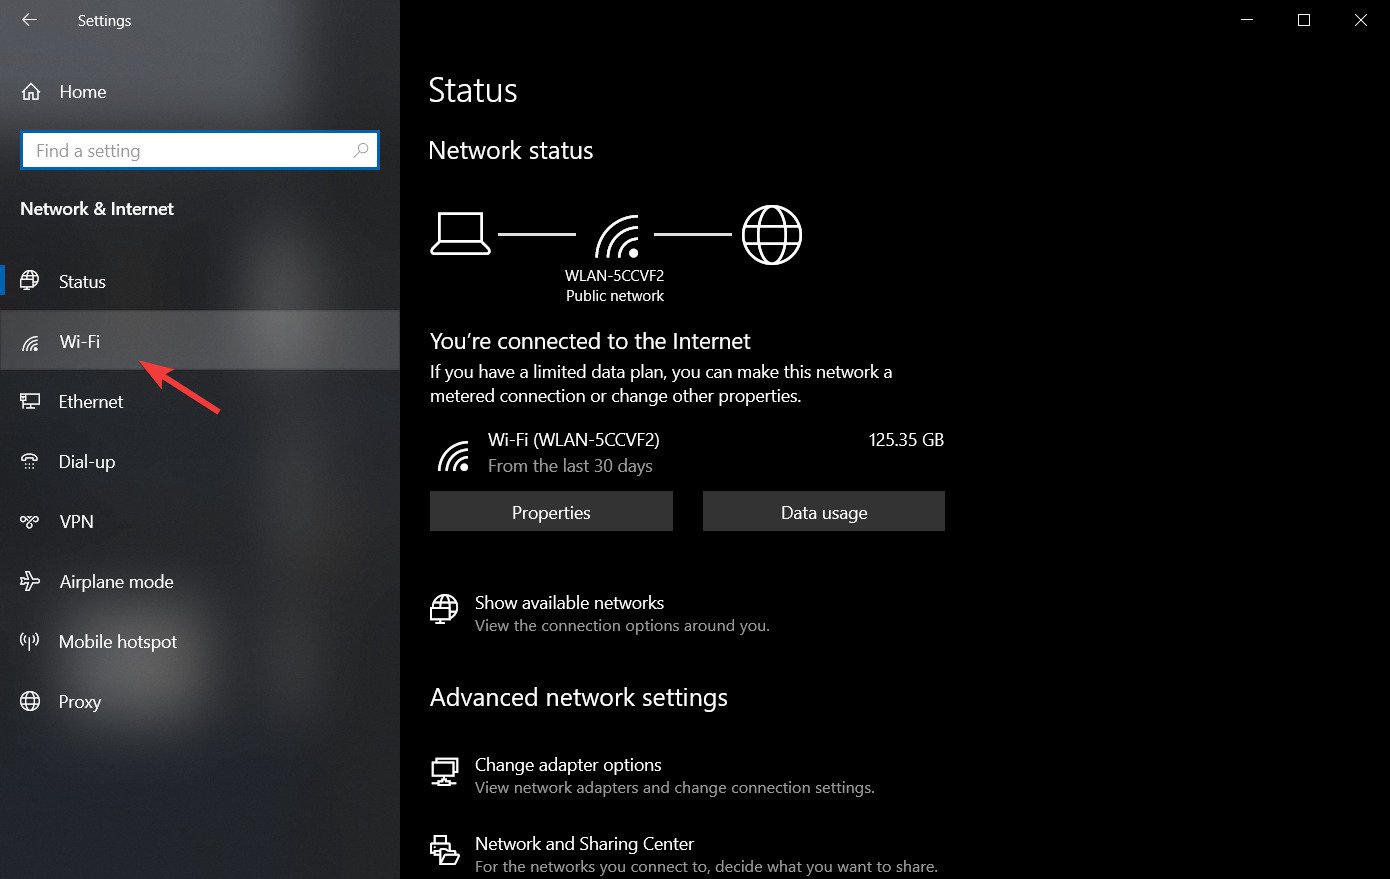
- Go to Wi-Fi and click on Manage Wi-Fi settings.
- Make sure that Connect to Wi-Fi hotspots and Send information about Wi-Fi connections to help discover nearby Wi-Fi are turned off.

Few users have reported that this solution has worked for them, so you might give it a try.
If Windows doesn’t find your Wi-Fi adapter, check out this article to fix the issue.
5.4. Disable and enable your network connection / turn on and off Airplane mode
In order to fix Windows 10 can’t connect to this network error, you can disable and enable your network connection to fix the problem.
In addition, you can try turning the Airplane mode on and off in order to fix this problem.
For any Airplane mode errors, you may encounter there’s this awesome guide that can be of help.
Windows 10 can’t connect to the network after a password change
If you’ve recently changed your password for the wireless network and now can’t connect to your network, you might want to forget the connection, as shown in a previous solution.
In addition, you need to check if your computer’s security type matches your router’s security type (also described above).
Additionally, toggle the option to connect automatically to your network to Off. This will allow you to input your new password.
What can I do to prevent these issues from occurring again?
➡ Keep your OS updated
Keeping your Windows 10 OS updated at all times not only protects you from encountering network issues but also keeps you safe.
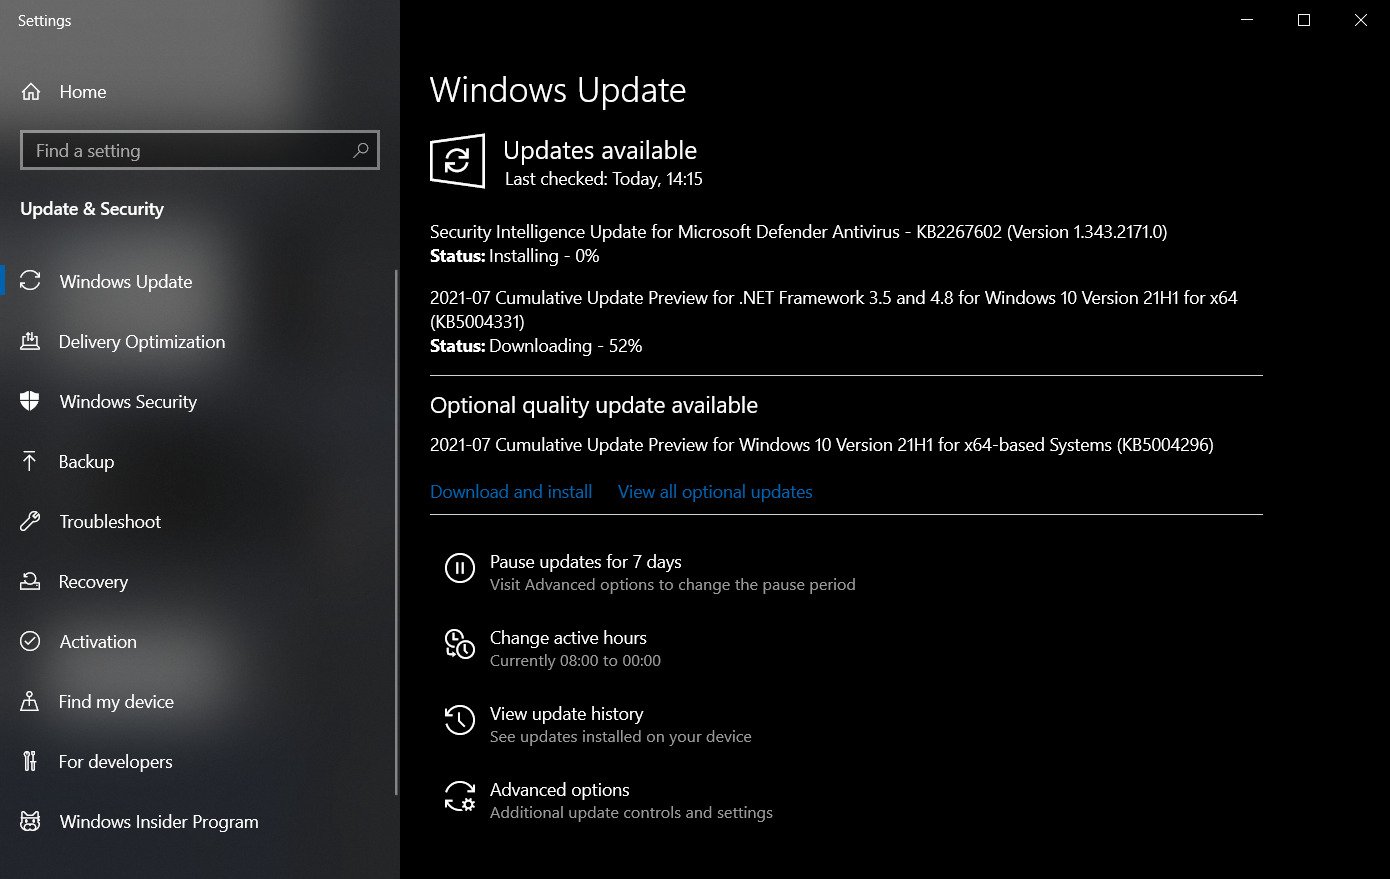
The latest Windows 10 release, updates the security features of your PC that will keep third parties away from your personal data, while also improving and fixing known bugs.
➡ Ensure that all drivers are updated constantly
To achieve this, you should either regularly use the Device Manager to manually search for updates for each of the important drivers, or you can use automatic and specialized software to do this job for you.
➡ Keep your network login credentials accessible
Losing your network credentials is not a huge problem, but it is enough to cause you unnecessary stress when dealing with network issues.
If you have this information easily accessible, you can first test out if the credentials were used correctly, and if not, contact your ISP provider for more details.
Dealing with network issues is never pleasant, especially if you were getting ready for a Netflix binge-watch session with your loved ones or require your Internet connection for online gaming.
Following our advice will certainly offer you a fighting chance in solving these issues as fast as possible, and once you do, our recommendations for preventing them from ever bothering you again can also come in very handy,
There can be many causes that can result in your device not being able to connect to the Internet. We truly hope that our solutions have been helpful and that you’ve resolved this issue.
If you have any questions, feel free to contact us in the comments section below.